So here's what happened:
After ordering the EZ Quilting DWR acrylic ruler, I sketched out several different patterns that I wanted to make on graph paper. I was able to roughly figure out how many A and B pieces were needed to make this project happen. Who knew you would need that many pieces for just 4 (not so little) rings?
 |
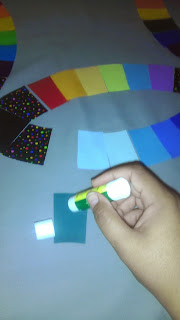
| I started by cutting up the scraps from my last major project: the Rainbow Ribbon quilt. I love my Kona collection of colors. (I wish I could afford to buy the bolt for each color they make. I would then need a bigger house to hold 220+ bolts!) |
 |
| A lot of little pieces to cut. (The original designer of this pattern had A LOT of patience!) |
 |
| Since I wanted to make a ticker-tape-style design, I cut freezer paper as a place holder for the rings on the background fabric. |
 |
| All of the cut pieces stayed on the "designing/dining room table" for a while before I settled on the quilt top. |
 |
| I loved how this template is just made for a rainbow design. The six A pieces formed lovely arcs of joyful color. |
 |
| Hindsight being what it is, I realized too late that the freezer paper would be too small because the templates of are for sewn arcs. |
 |
| This part was not as easy as it might look. If they are not lined up just right, the circles will not close. (It took 2 days of not sewing a thing to get all four rings to work!) |
 |
| Three glue sticks later... |
 |
| ...I didn't trust taking it to the machine so I taped them, too. (Hindsight again says why didn't you just use double-sided fusible before you cut the pieces so you could just iron them?) |
 |
| I sewed around the edges of each ring so they would say in place for layering the quilt. |
 |
| Once they were sewn, the fun part was taking off the tape to see how many arc were left to sew. (Almost as rewarding as popping bubble wrap.) |
 |
| The top is finally finished! |
 |
| It's sandwich time! (Also known as time to mop the floor first before you do anything else.) |
 |
| I like when I can start to see the finish line. |
 |
| I spray basted and pinned this beast. I don't do both steps often so when I do you know it's love. (Or the fear of puckering...) |
 |
| Round and round I went, stopping only to sleep and eat. |
 |
| I finished the binding last night and went to the park to get the best light today. |
 |
| When Two Become One |
So I call this quilt When Two Become One because that's what I feel a marriage represents. When two souls that are quite different (slightly off centered at times) join together, they form a beautiful union.
Quilt Info:
Name: When Two Become One
Completed: 11/29/2013
Size: 60 inches by 76 inches
Materials: Kona solids
Cotton scraps (rainbow polka dots and black and white checkered prints)
Three shades of gray background fabric
Warm and Natural cotton batting
Rainbow hearts cotton backing
Gutermann Thread (Colors 5709, 102, 6206, and 116)
Glue Stick (acid-free)
Quilter's tape
EZ Quilting Double Wedding Ring Acrylic Templates
Thanks for reading my post. Hope it inspires you to get creative and make your own Double Wedding Ring quilt.
No comments:
Post a Comment