I finished my design of the Double Wedding Ring for the DWR Challenge. I spent a good part of the day cutting and organizing my colors so I can start sewing them next weekend. I'm pretty excited about the outcome and can't wait to show you when it's all done.
 |
| All 194 of my little "A" pieces! |
I decided to make them a Tetris quilt! It's squares that I can make really large and piece together really easily. I decided on 5.5 inch blocks then got to work on graph paper to make up a design. I haven't played with my Sharpie colors in a while so this was a lot of fun.
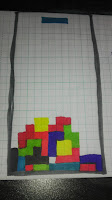

Once I had the design I wanted, I counted up the number of colors and background blocks I would need. (Somewhere along the way, I changed up the final design so please don't copy these numbers if you want to make one, too. It would be best to draw your own and count them up to work for you.)
I had to do more cutting which took no time (or any fancy templates!) to get this little baby going.

 |
| Crossing out the row as I went, helped me stay organized. I almost duplicated a row which would mean picking threads out and starting again. Yuck! |
I used Post It Notes to keep all rows in order as I moved up the line and when they were all done, I lined them up to make sure I had my design just right.

My secret for lining up squares perfectly is to use pins. I stuck a pin in the opposite end of every other row to keep them organized for ironing. (I don't have a good pic but simply: Left side pinned in rows 1, 3, 5, 7 etc. Right side pinned in rows 2, 4, 6, 8, etc.) Then, I ironed each row using the pins as a guide for which direction to press the seams.
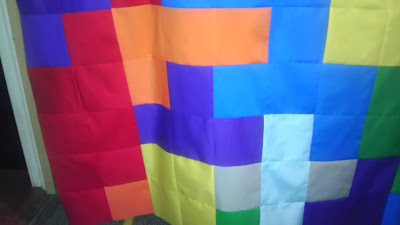
I finished sewing my rows together and will be adding a border with some other finishing touches in the next few weeks. Here's what I have so far:
 |
| I iron from right to left. I place my pins on the ironing board on this side so I can just press in one direction. Make your preference work for you. |
 |
| When you bring your rows together to sew, they nest perfectly every time. |
I finished sewing my rows together and will be adding a border with some other finishing touches in the next few weeks. Here's what I have so far:

Quilting this will help emphasize the individual blocks that make up a Tetris piece and help this design pop. Since each color has a distinct shape, it's hard to tell the separation when looking at just the quilt top. More pictures to come!
I didn't plan on writing a tutorial but I saw the "Process Pledge" on another blog and think I should share how I create my quilts as I blog more this month.
I hope this gives you some inspiration for making your own pixelated design of something you'd love to see. I'm thinking about making a shades of black and green Tetris quilt next to make it look like the original Gameboy version I played when I was a lot younger.Then, there is Galaga, Pac-man, Ms. Pac-man [I would have called her Pac-woman but I digress]...I can make a long trip down memory lane using the old 8-bit or even 16-bit games we used to play.
Did you get to sew today?
(Hope your Sunday was a fun day!)
I am officially tired and heading to bed early for a change.
No comments:
Post a Comment